

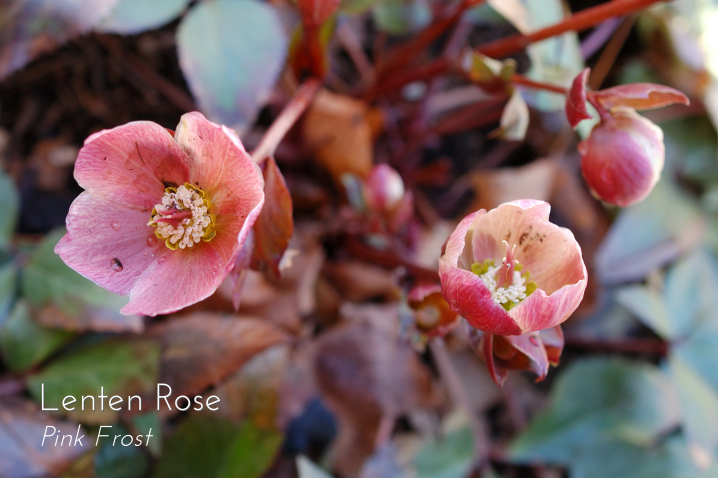
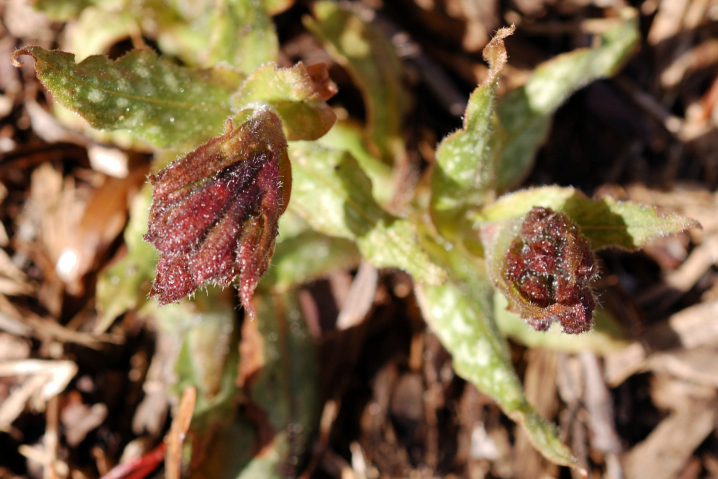
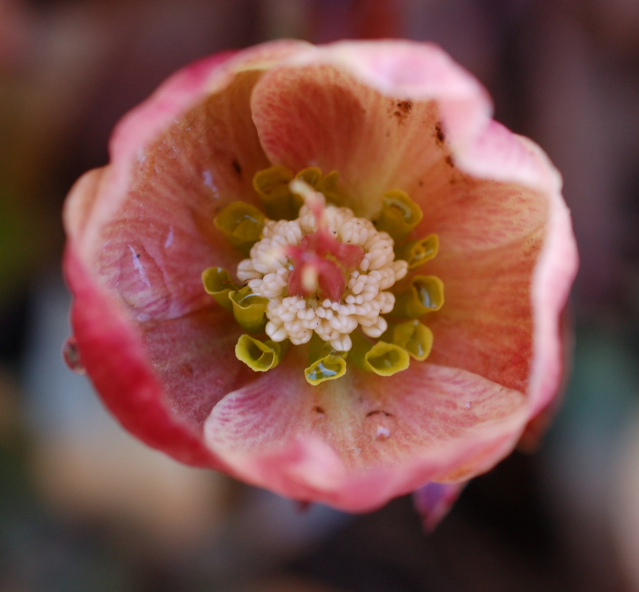
  The Pulmonaria (Lungwort) will have gorgeous purple flowers very soon. 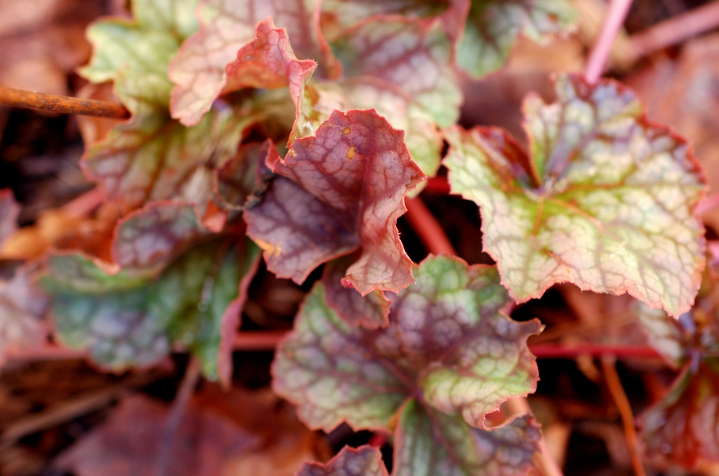 Bright new leaves from this alumroot (heuchera) are emerging from last season's faded leaves. 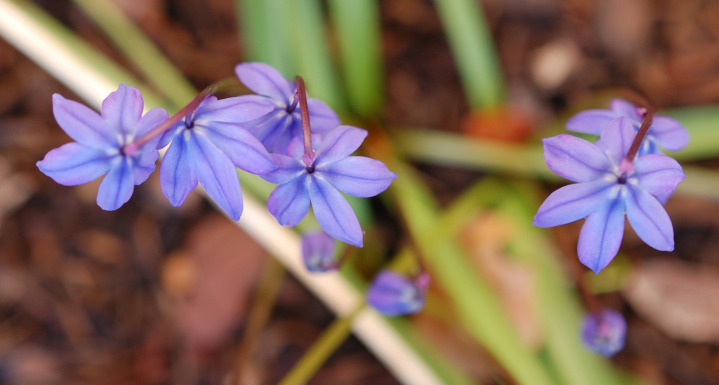 I have no idea what these are, but they're pretty. 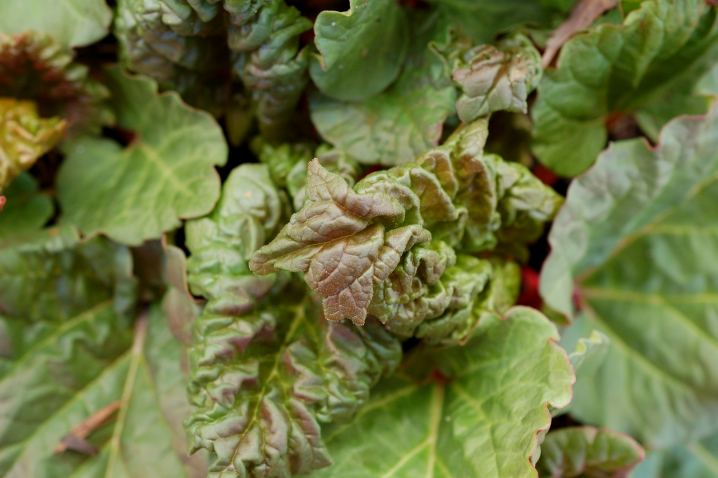 Rhubarb! Hooray!
0 Comments
A while back, I wrote a post about repurposing clementine orange crates as shelving. I always have a stash of clementine crates that people save for me (thereby keeping them out of the landfill), and in most cases, I dismantle them to make other things. But there are also many ways to use these strong little wooden boxes around the house without much alteration. Reign in the Paper Clutter A standard clementine crate is 11.75" (30 cm) long and 8" (20 cm) wide (it is perhaps dorky that I know this, but there you go). So it's a good size for storing mail and paper clutter. I hot glued some burlap to this clementine crate (including the bottom so it doesn't mark up my counter) and set it on my kitchen counter to collect all the random papers that accumulate at our house. This keeps the papers in one place instead of scattered all over the place. Every few weeks, I sort through it to file things away or recycle the papers we don't need. Minimize Cupboard Chaos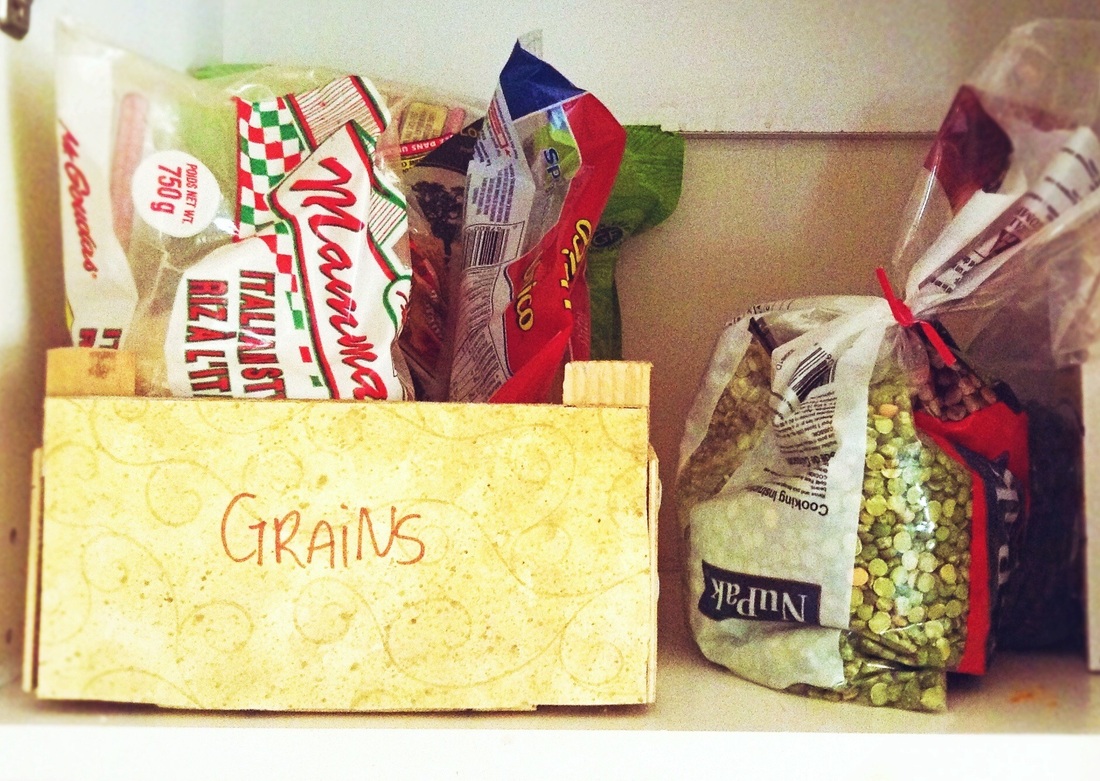 At 11" (30 cm), the length of a clementine crate suits the depth of any standard kitchen cupboard. It's a perfect basket for organizing bagged and packaged goods in your pantry or kitchen cupboards because it's straight and strong (after all, it carried 30 some odd pieces of fruit across thousands of kilometres). I covered this crate with paper and labelled it. When I need rice or noodles or quinoa, I just pull the crate off the shelf. Easy peasy, and no disastrous spills of thousands of tiny grains. Tidy Up Your Cookbook Stash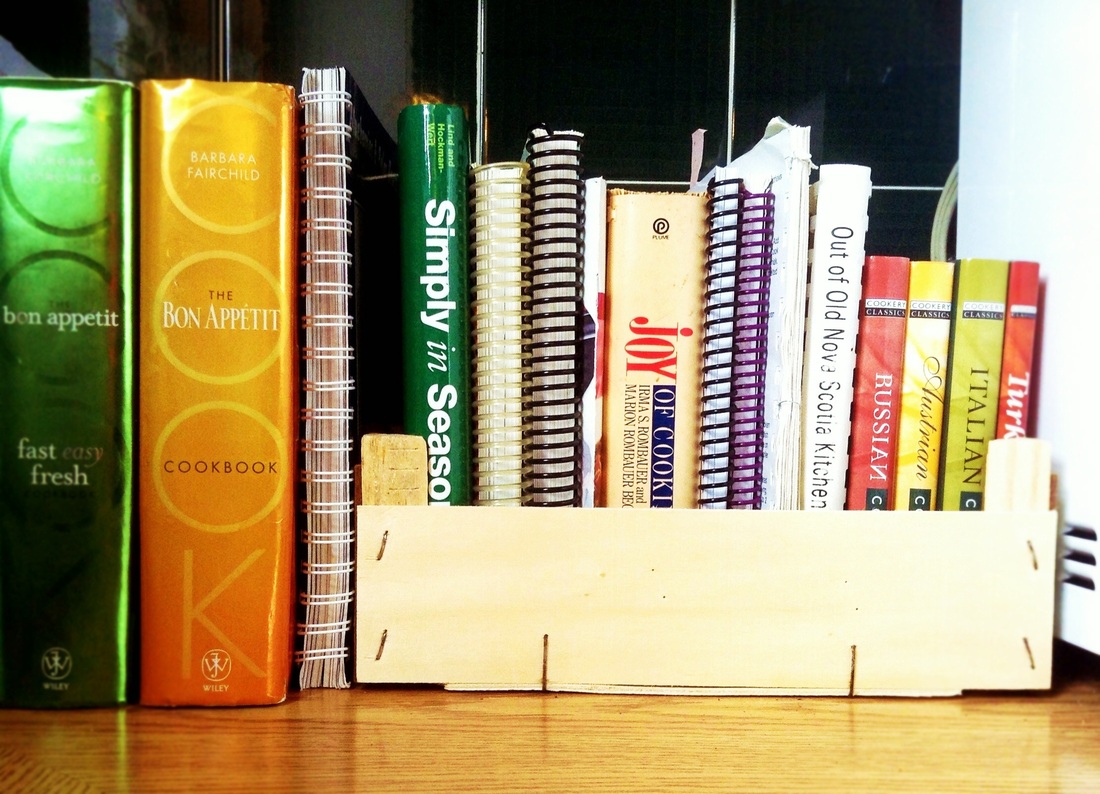 If you're like me, you have too many cookbooks: some enormous ones that nearly break your wrist when you pull them out of the stack and some small and thin ones that never stand up properly. A clementine crate is the perfect solution because it's the right size for small books, and its flat bottom and sides keep the books nice and straight. (It's okay: "flat bottom" makes me laugh too.) A clementine crate full of books makes a sturdy book-end for your wrist-breakers as well. So, there's three ideas for the next three clementine crates that come home with you from the grocery store. As for the rest, give them to me :)  My husband Dan is pretty great. For many reasons. He's smart, funny, honest and generous, to name a few. He also finds me great birthday gifts. On several of my birthdays over the years, he has given me some spiffy garden tools, accessories, and books. With my birthday in the cold depths of February, these gardening treasures get me excited about the promise of spring and the smell of dirt, blossoms, and rain.
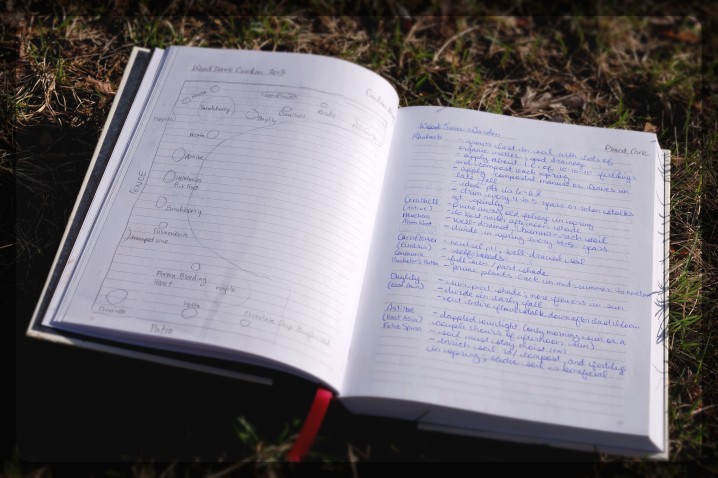
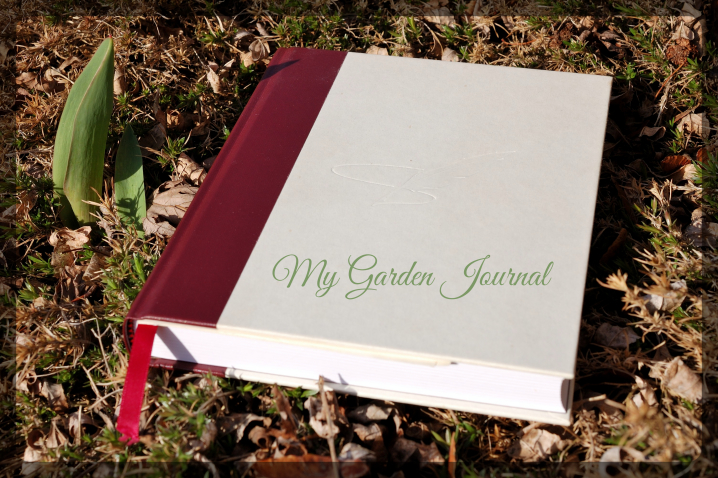
I start planning and dreaming about my garden pretty early in the year, and I have accrued quite a collection of random scraps of paper with notes and drawings. They've always been disorganized: sticking out of gardening books or magazines, or lying crumpled and muck-stained on a dusty shelf in the garage. Needless to say, I've wasted a good amount of time looking for the notes I've written to remind myself of things from season to season. Receiving the garden journal was a wee revelation. 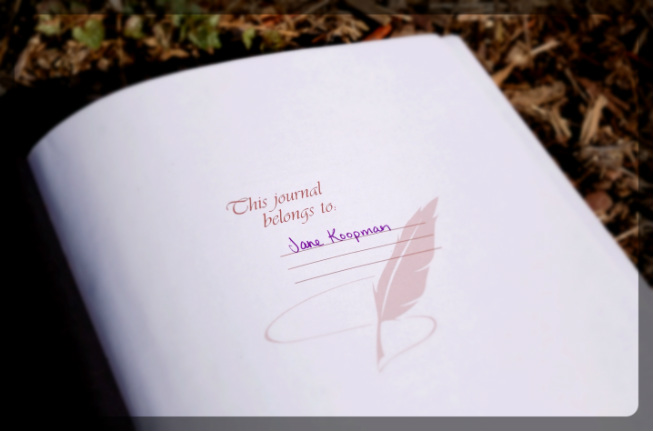 The Lee Valley garden journal is built to last, with all the acid-free pages sewn into the binding. So even though it's a beautiful book, I have no qualms about taking it outside and thumbing through it with dirt under my nails. The journal has page numbers and a blank index at the beginning of the book that you fill in yourself. That's a pretty handy feature because I can easily find the notes I need to consult. And everything's all in one place, not scattered all over my house and garage. I keep track of things that will help me out in the current garden season:
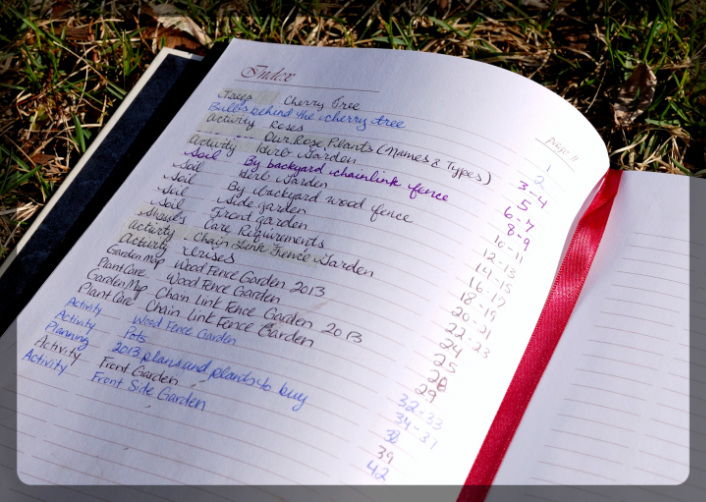 I also write down things that will be helpful to know in future gardening seasons:
 Keeping track of all this information might seem a little anal. And it probably is. But for me, it's just one more enjoyable part of a process and passion I already enjoy so much. Keeping a garden journal lets me enjoy gardening even when I can't dig a spade into the earth, when all the plants are huddled under their blankets of fall leaves and snow. It keeps me organized, and I think it probably helps me take better care of the plants that have been entrusted to me. If you want to start a garden journal, you don't need to get a spiffy Lee Valley one like I have (thought it sure is nice). All you need is a notebook or a binder, a pen or pencil, some ideas, and some insights. Oh, and some plants to write about. 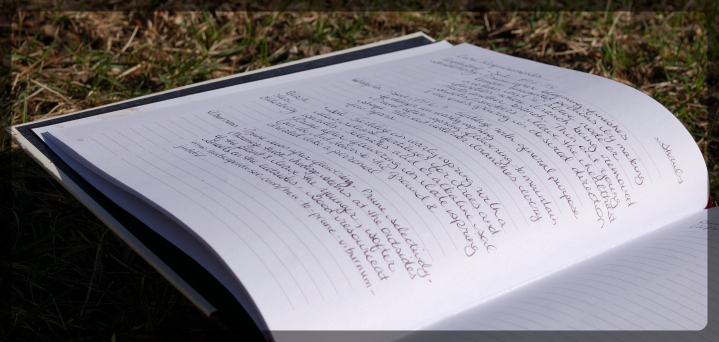
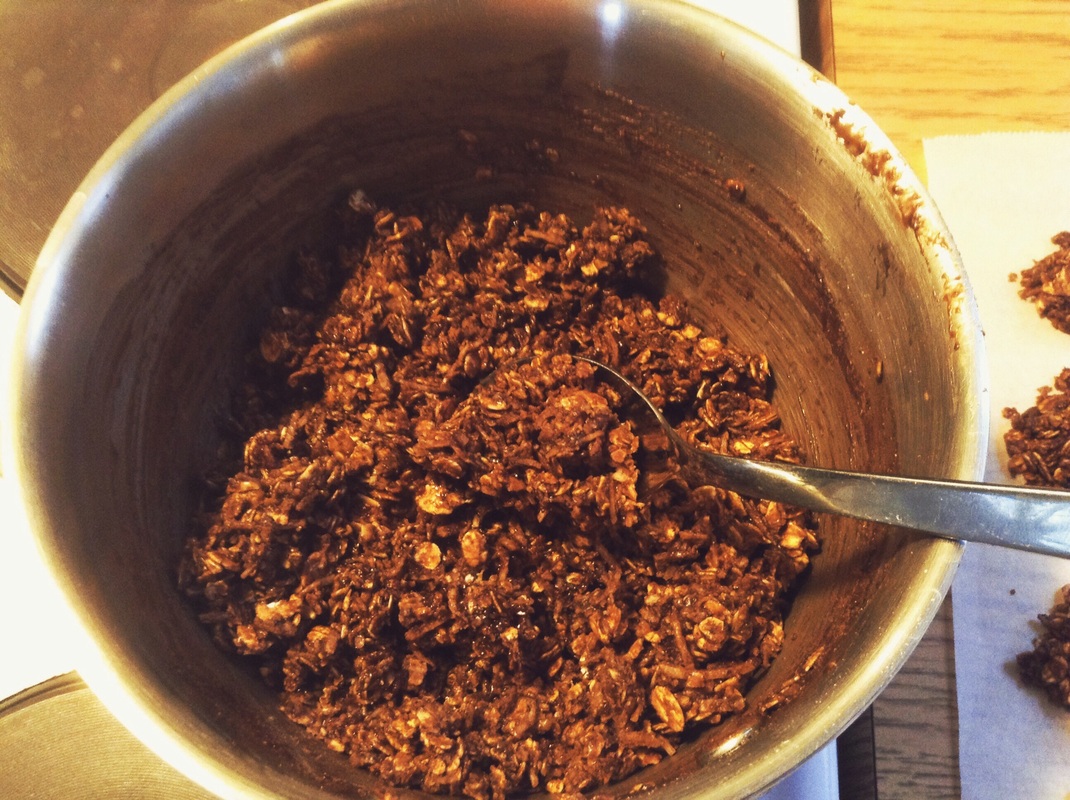
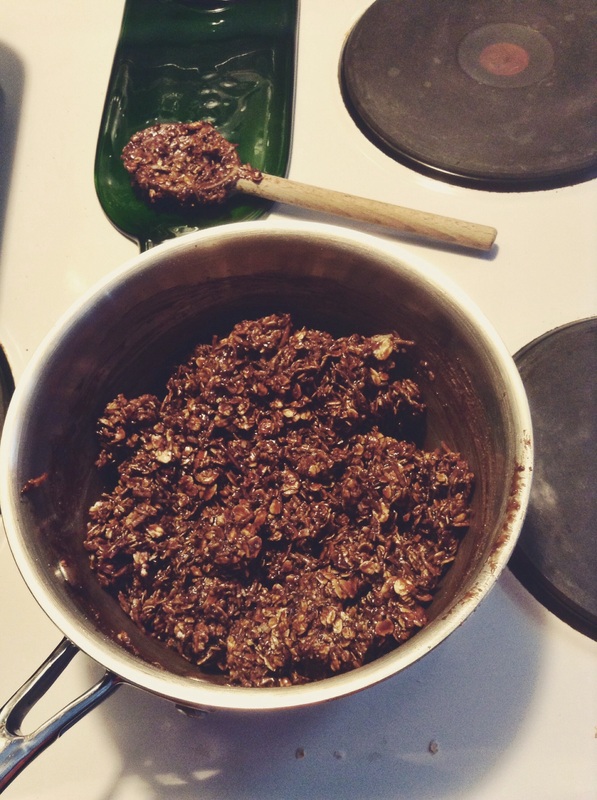
So two days ago, on March 11, I was walking around in the glorious sunshine with my coat off. Then I woke up on March 12 (yesterday) to see this. 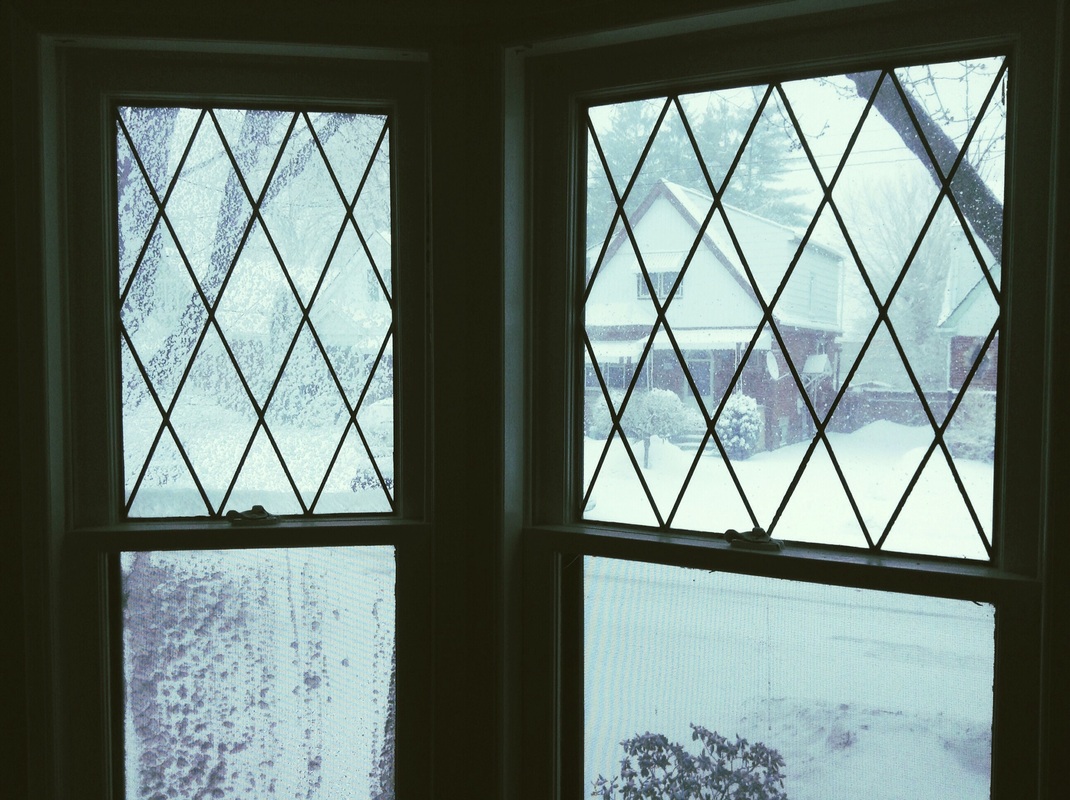 Ew. I love snow, but not really on March 12 anymore. March is when my itch to garden begins, after all. Well anyway, I had planned to do groceries yesterday, but with the treacherous weather (i.e. snow blowing sideways), I decided to burrow inside for the day. Our food supply was low, especially in the snack department, and that just wouldn't do, especially because Dan had to work last night. The man needs snacks to get through a 12-hour night shift. And hey. I always need snacks. Normally, I like to bake to supplement our snack supply, but with my grocery shopping plans spoiled yesterday, I didn't even have the basics for baking. No flour. No milk. Limited butter. 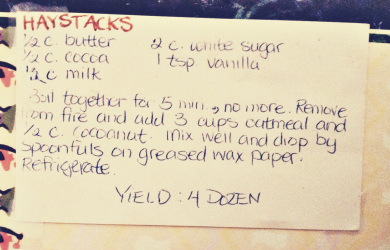 But then I remembered a staple treat from my childhood. Chocolate haystacks: hearty little treats full of chocolate, coconut and oats, and not a stitch of flour. And you don't even have to turn on the oven to make them. It's one of the recipes I wrote out before I left home for university, and I still have it. So yesterday, I dug out my beat-up recipe card and got to work. 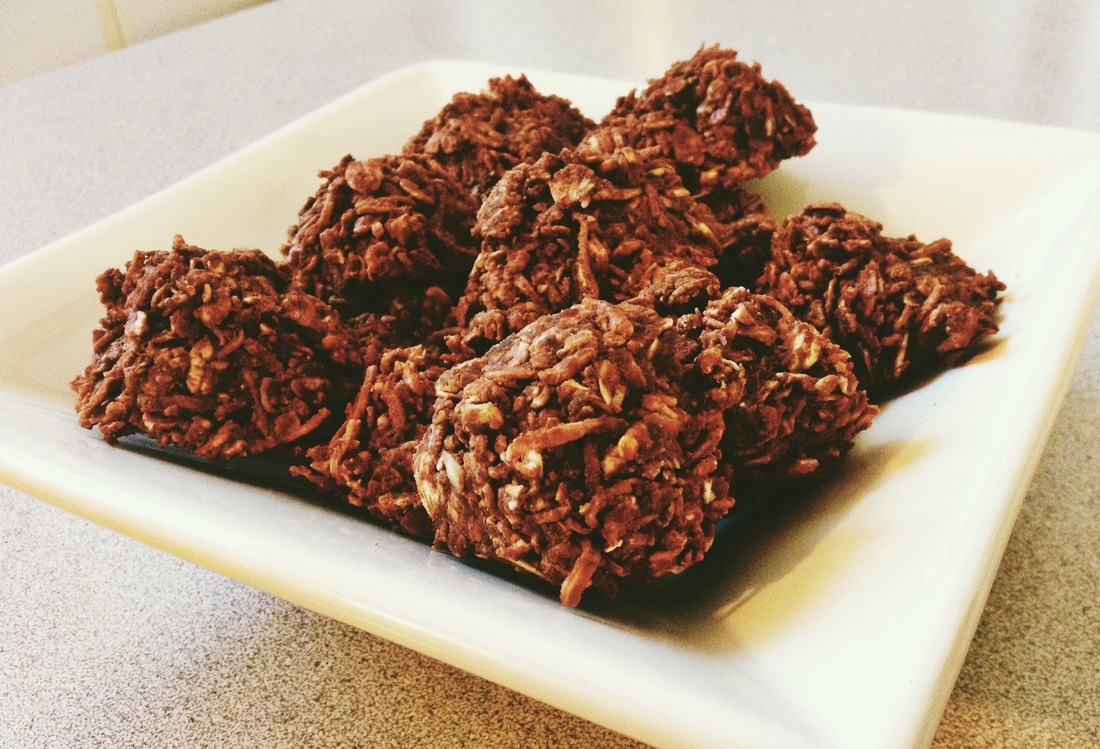 I had everything I needed to make half a recipe, except for milk. So I improvised by using some Bailey's Irish Cream instead. Tee hee. The short version recipe is at the end of this post, but I'll walk you through the super easy steps first. Measure out the first five ingredients - butter, cocoa, milk (or lush-like substitute), sugar and vanilla - and put them into a saucepan. Bring the mix up to a boil, stirring regularly. My old recipe says you should let the mixture boil for five minutes, but it depends on your stove I think. Really, you just need to make sure the sugar is well dissolved (I did three minutes). 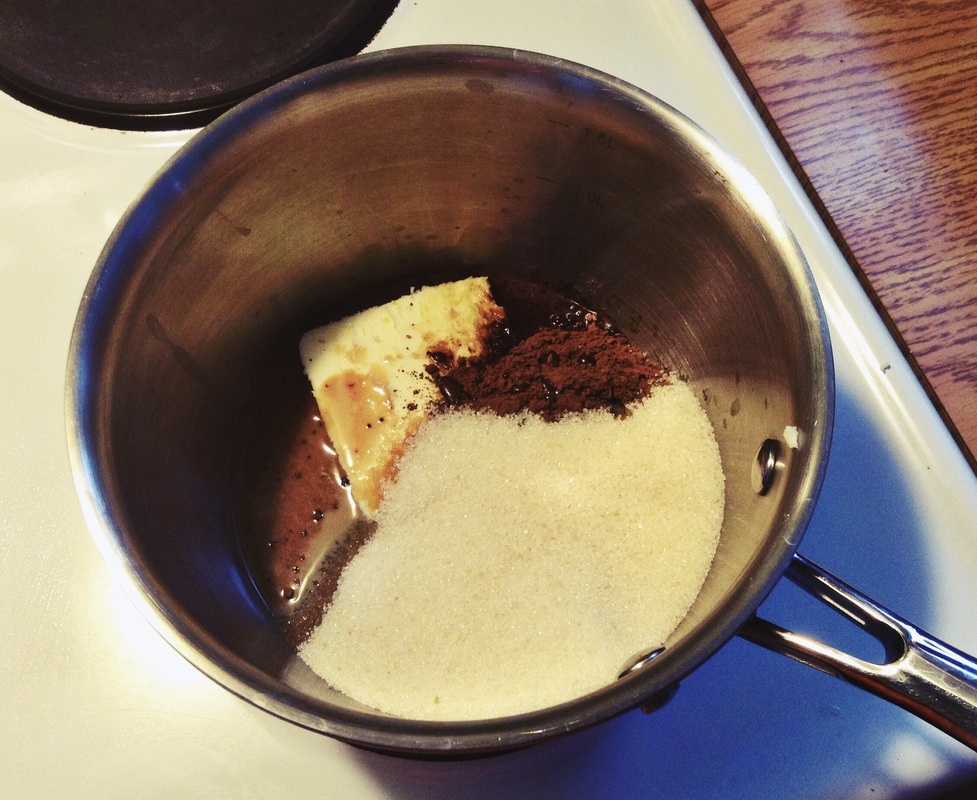 When you have a nice, chocolatey soup, add your oats and coconut. Despite what the recipe suggests, I think the ratio of oats to coconut is really up to you. 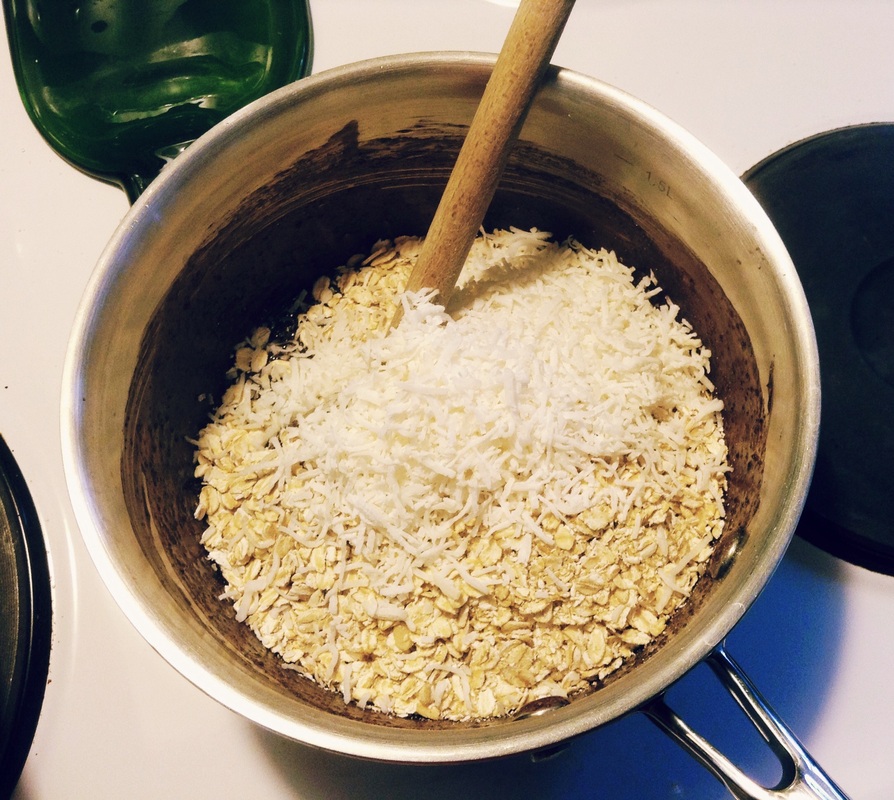
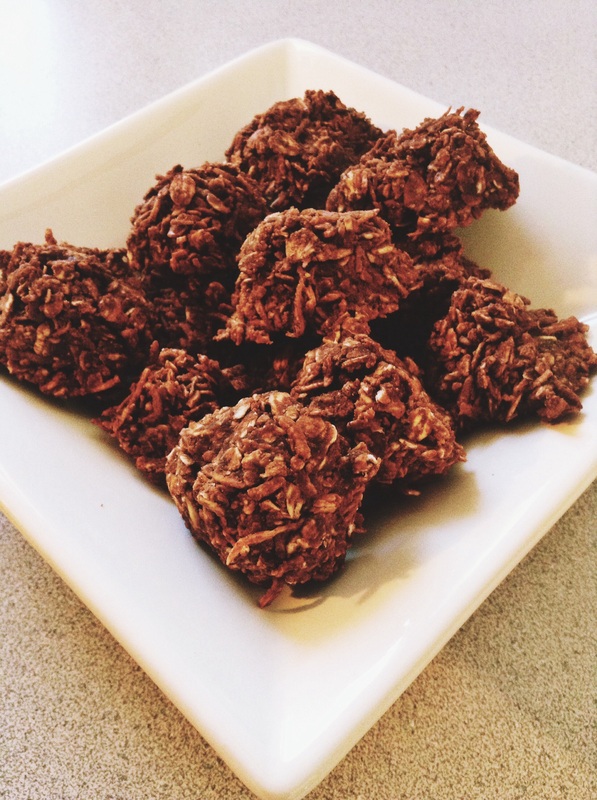
 Et voila! After a while, the haystacks will get solid, and you can take them off the parchment and put them into an airtight container to store. They won't stick together. 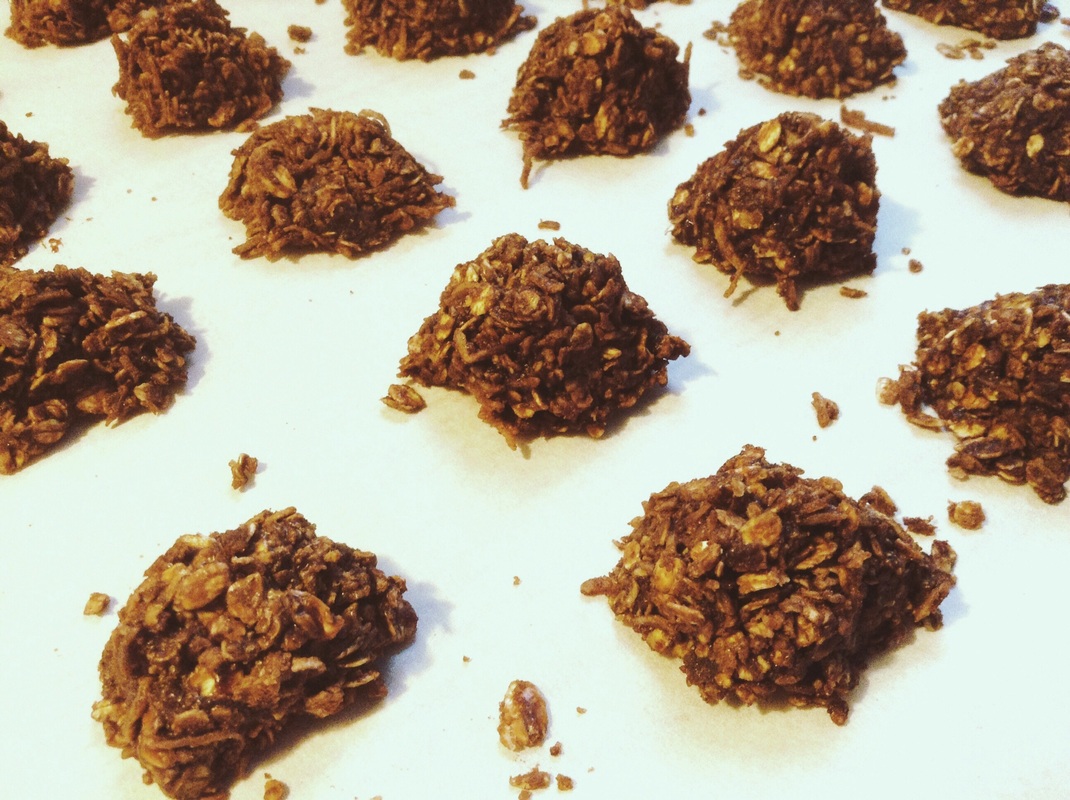 A note about my boozy experiment . . . Adding Bailey's to the haystack mix changed the flavour significantly. The irish cream flavour overpowers the chocolate quite a bit, so it's basically like having a different flavoured haystack. I still prefer straight-up chocolate, but if you're a big irish cream fan, you'd probably go mad for this variation on the standard recipe. You should adjust the sugar though. My suggestion would be to use 1 1/2 cups of sugar instead of 2 (less if you don't like things too sweet). 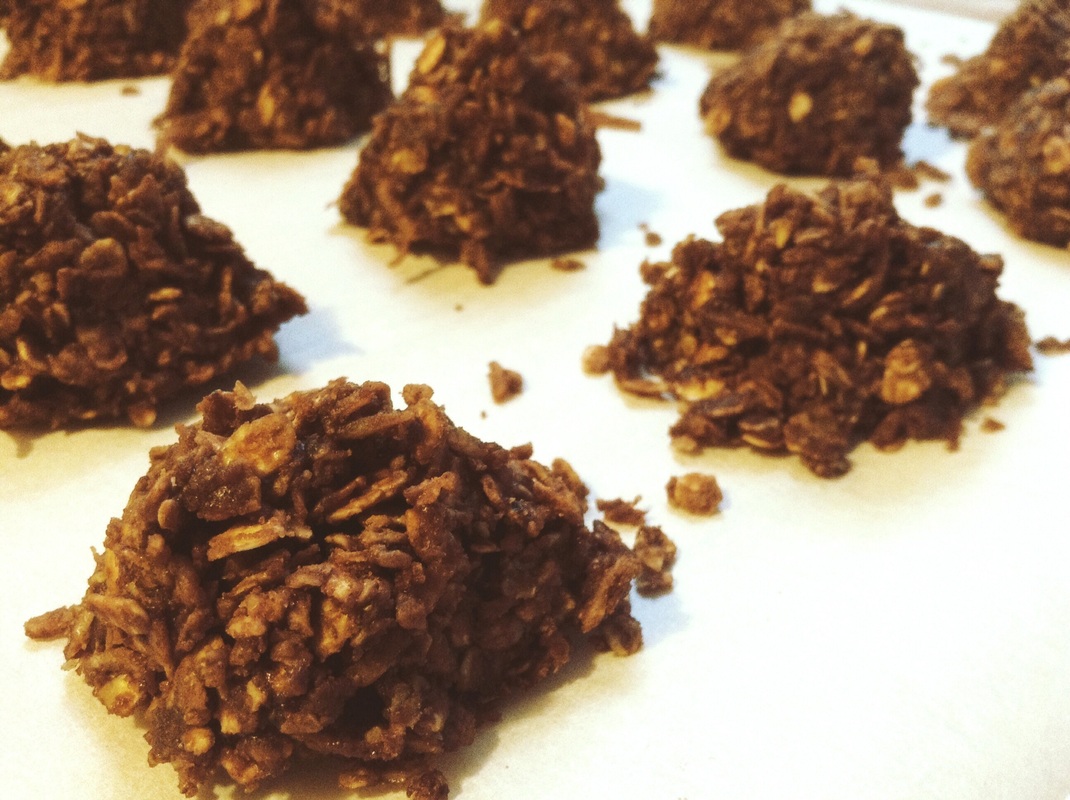 From a kitchen short on resources, these mini piles of chocolate goodness provided some cozy comfort on a blustery and frigid day. Now that I've rediscovered them, I'll probably make them more often. Here's the less long-winded version of the recipe . . .
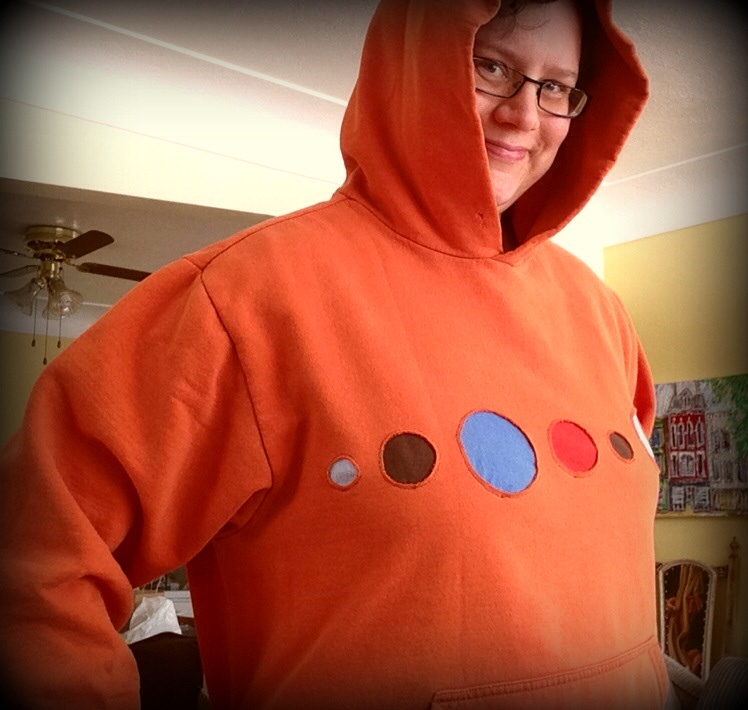
  I am very attached to this orange sweatshirt. There's no reason for it: it's old, the drawstring for the hood has long disappeared, and orange looks terrible on me. But it's cozy and lumpy and soft and warm, and I love it. So when I got a stain on it a few months ago, I was dismayed. I've had it in my mind more and more that I'd like to upcycle my clothes that are worn, stained or ill-fitting. This seems to me a responsible way to manage my wardrobe: it would save me money and allow me to save beloved pieces. It would also prevent my clothes from becoming part of the pile of second hand store discards that get shipped overseas by the pound. (Millions of pounds of bulk second hand clothes get shipped from western nations to developing nations. There are mixed opinions about how these shipments impact local economies.) The only problem with my upcycling ambitions is that my sewing skills are, well, scarce. I have lots of ideas, but I'm not sure I have the skills to execute them. Serendipitously for me, some inspired young women in my church decided to start Sewing New Hope: a community sewing circle. Since January, we've hauled out our sewing machines every Thursday night and done some sewing between sips of coffee and intervals of conversation. Among this lovely group are some ladies with mad sewing skills, and they willingly help the rest of us who don't always know what we're doing. Each week has a project or sewing skill to focus on if we want, but we can also work on our own projects. This is my opportunity to bring some of my upcycling ideas to life, and I figured I'd start with my beloved orange sweatshirt. Here's what I did. Okay, so you can't really see the stain very well in this photo, but trust me, there's a stain. In the next photo, you'll see what the weird circles are. 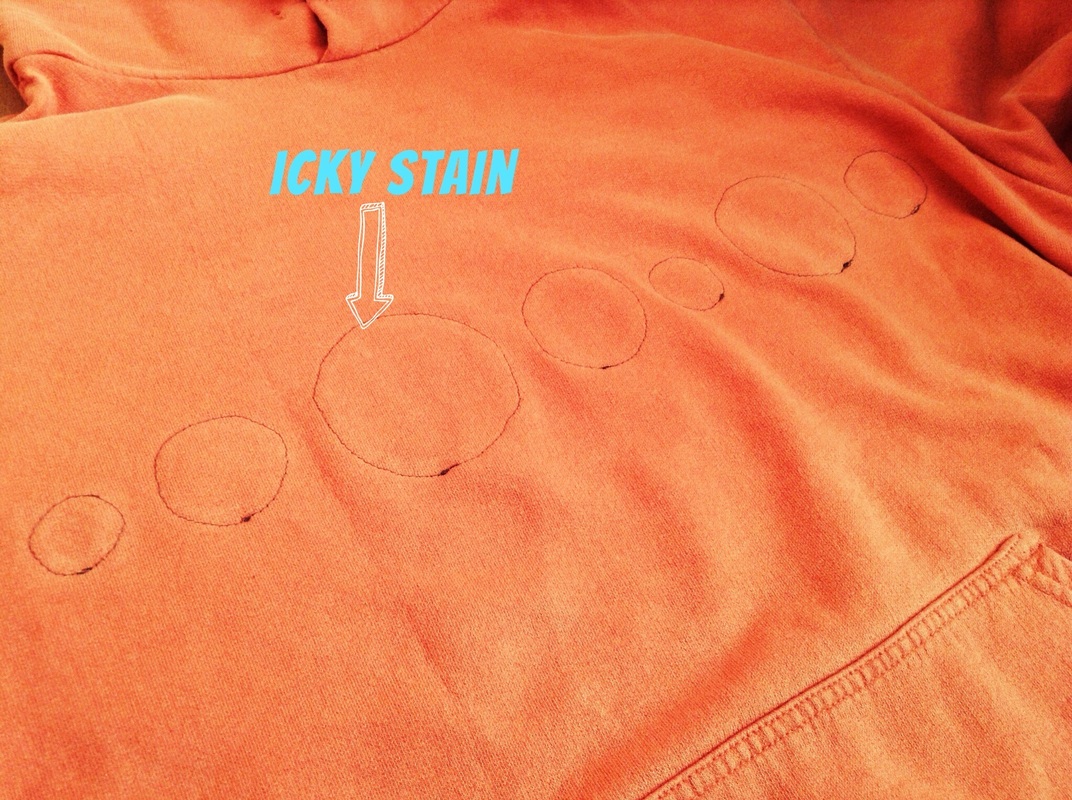 I cut circles out of some cotton t-shirt scraps in brown, light blue, medium blue and burnt orange. With safety pins, I pinned the circles onto the back of my sweatshirt because I wanted to create reverse patches (that's what I'm calling them, anyway). Following the advice of one of my smart sewing circle friends, I hand-basted the circles onto the shirt so that I wouldn't have to deal with pins while working with the sewing machine. For those of you who are sewing newbs like me, basting is loosely stitching something in place. It is also, of course, what you do when you cook a turkey.  And another tip for those with limited sewing experience: sewing circles with a sewing machine is not as simple as it might seem. Maybe modern machines can be programmed to sew curves - I have no idea - but my old-school Singer sews straight lines. This means I had to use a very light touch with the foot pedal and lift the sewing machine's presser foot every few stitches so that I could turn the fabric. I used brown thread to stitch all the circles. 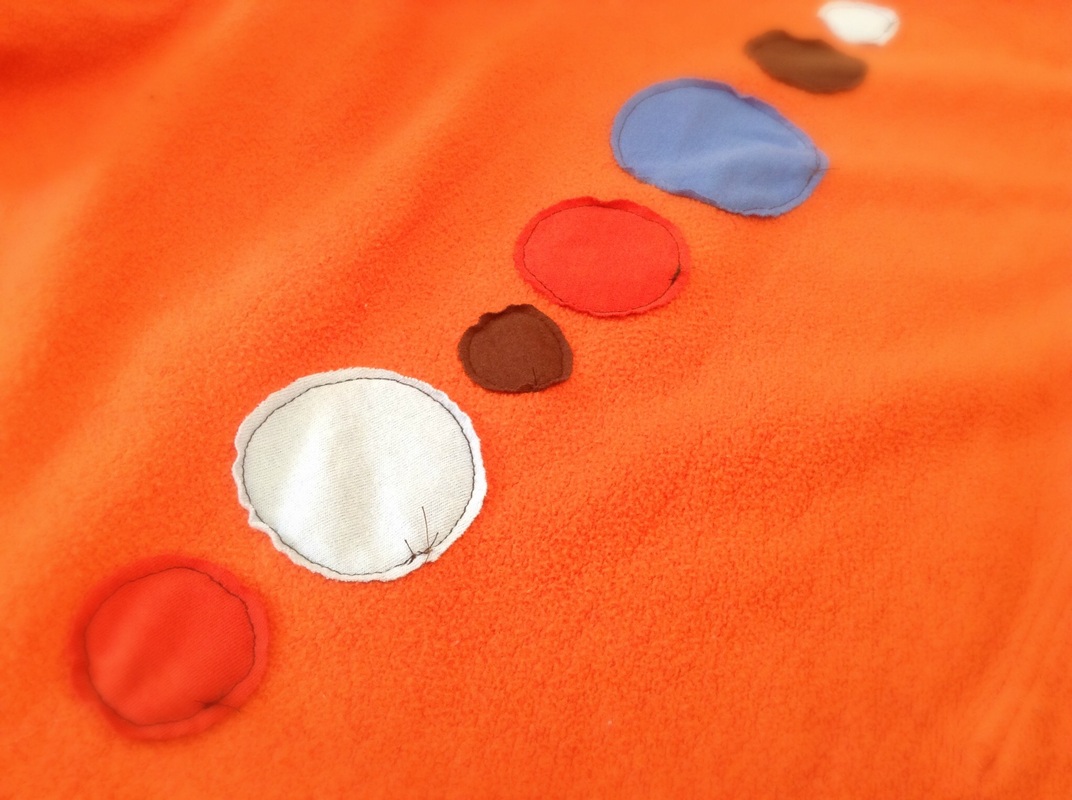 Here's what my sweatshirt looked like after I sewed the circles onto the back and turned it right side out. 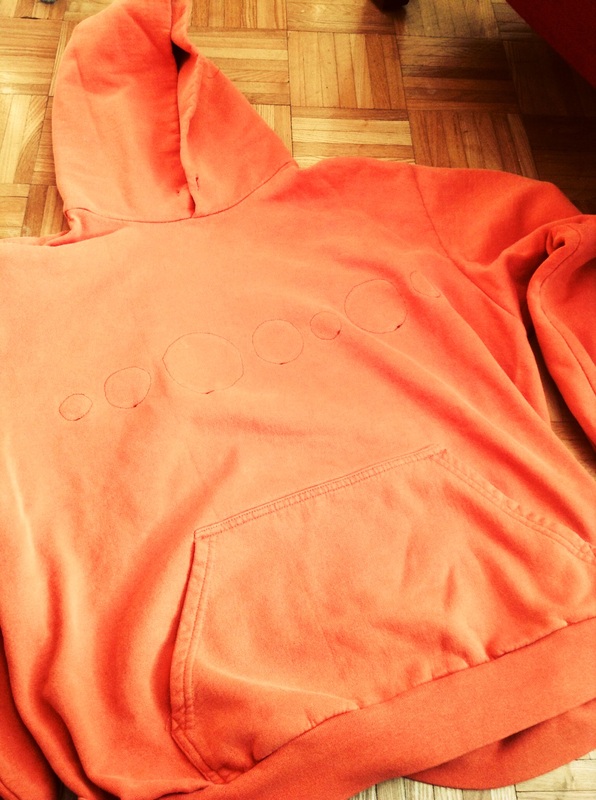 Next, I cut the sweatshirt fabric from the front of the shirt to reveal the patches beneath. With one hand inside the shirt holding the patch, I pulled the front fabric up with my other hand to separate the two pieces of fabric. Then, I nipped the front fabric, being careful not to cut the patch, and then cut out a circle along the stitching. 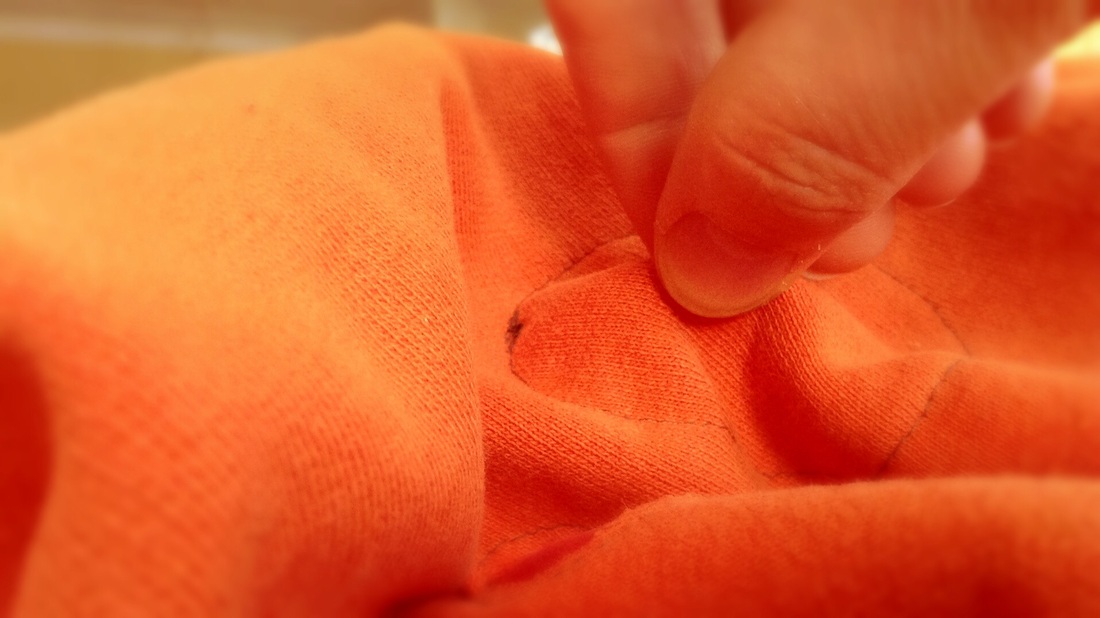  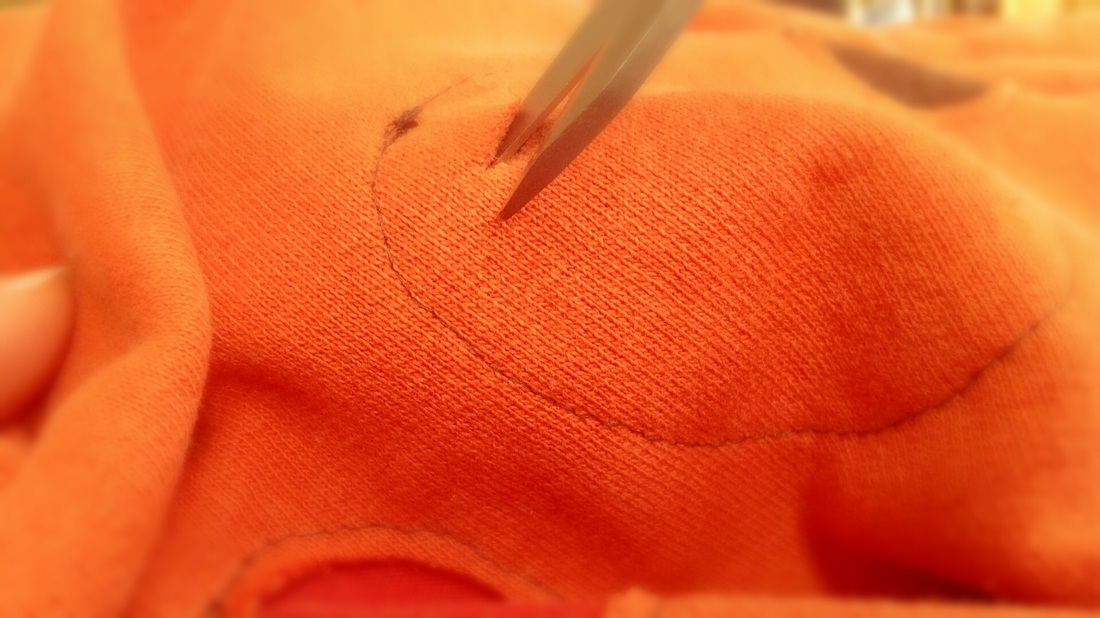 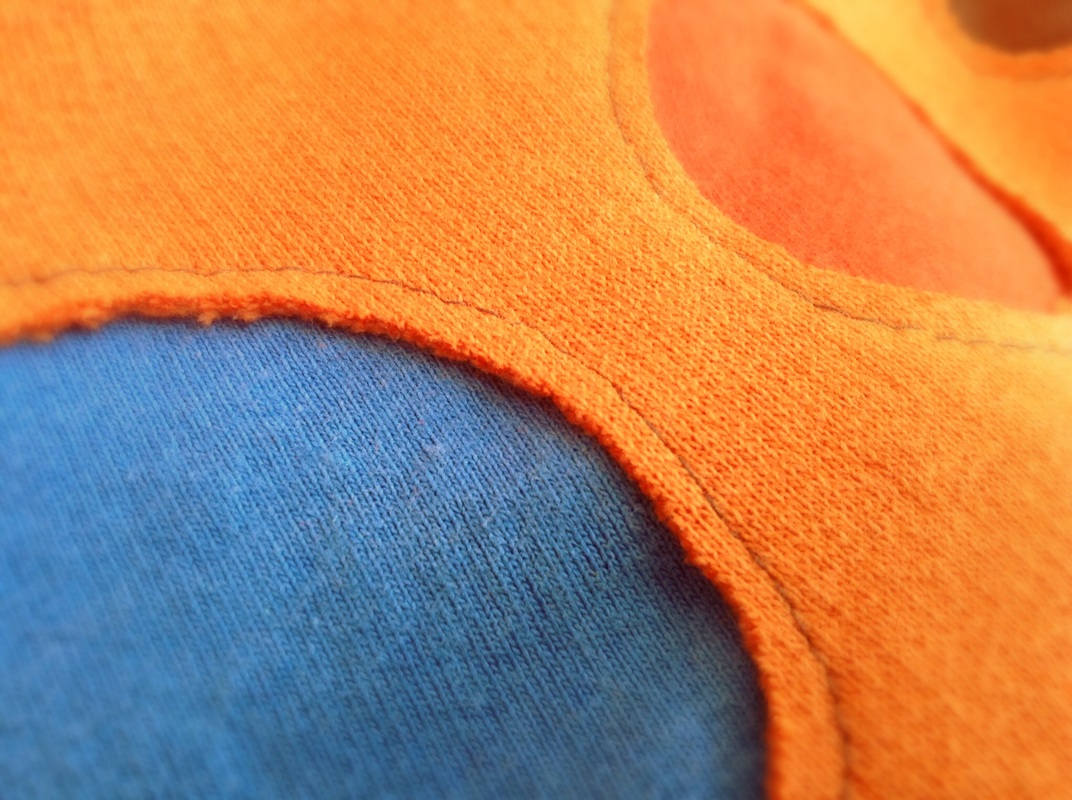 So there you have it: my beloved cozy sweatshirt reinvented. Not only is the unsightly stain gone, but my shirt has a unique and colourful new style that I'll be glad to wear.
Sorry if I've blinded you with all the orange.
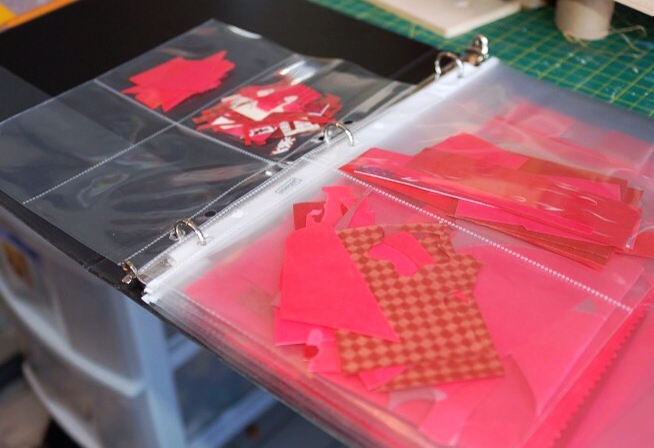
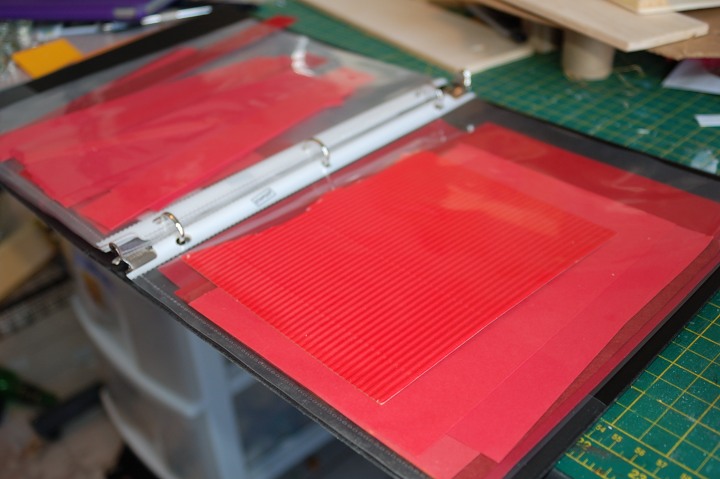
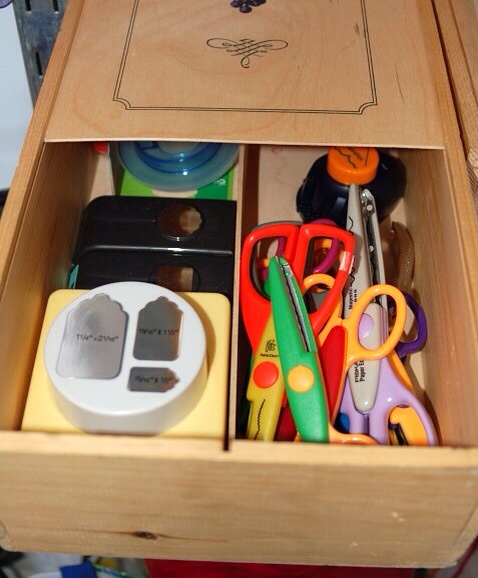
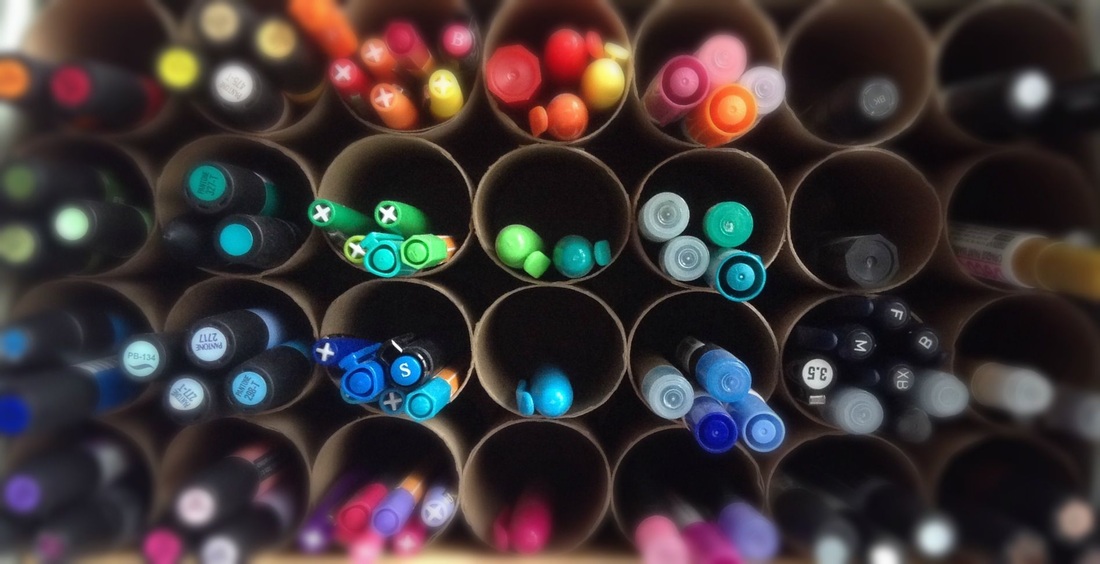
Now. What shall I upcycle next? So, January's nearly over, and my daunting art studio organization project is nearly done. Next week, I'll do the dramatic "reveal" of my new space, and in the mean time, I thought I'd share some of the tricks I've used to get there. I've gleaned many of the ideas from books and Pinterest, and some I even came up with all by myself. Cutting Through the Clutter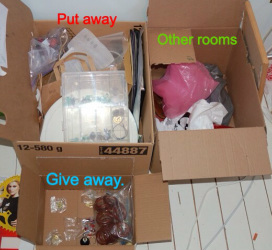 This idea from Kathi Lipp's book The Get Yourself Organized Project helped me feel less overwhelmed as I approached the chaos in my art studio. Lipp suggests that, when you begin to clean up and organize a room, you have ready three boxes and two bags. In Box 1 you place anything lying around that needs to be put away within the room. In Box 2, you place the things that belong in other rooms of the house. Box 3 is for the things you want to give away. The two bags are for garbage and recycling. In the photo, you can see my three boxes. Using this little system cleared the clutter so that I could focus on organizing my space. After all, what's the point of putting things away if you don't know where you're going to put them? The three boxes also kept me on task. Instead of getting side-tracked by putting things away in other parts of the house, I just put them in my "other rooms" box to deal with later. Scrap Paper Organization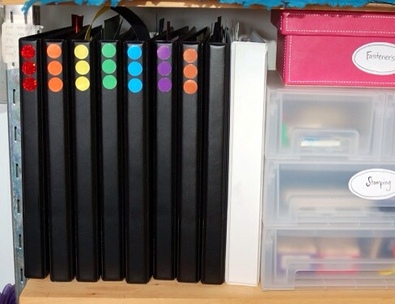 I have a lot of scrap paper, and keeping it organized has always raised my blood pressure. I never know where to put it, and more so, I don't know how to find the pieces I want to use when I need them. I came up with this idea, and I'll see how it works: I sorted all the scrap paper by colour, assigned each colour a binder, and organized the paper in each binder with page protectors. The page protectors help me organize the scraps into similar sizes and shapes - as you can see below - so that I can find exactly what I need when I'm working on cards and art. I adhered coloured stickers to each binder's spine so that I can easily pull the binder I need off the shelf when I want to use some paper or put it away. As you might have guessed, the white binder stores white and off-white papers. The binders are within easy reach of my art desk to accommodate my laziness.
Mmmm . . . Wine Boxes
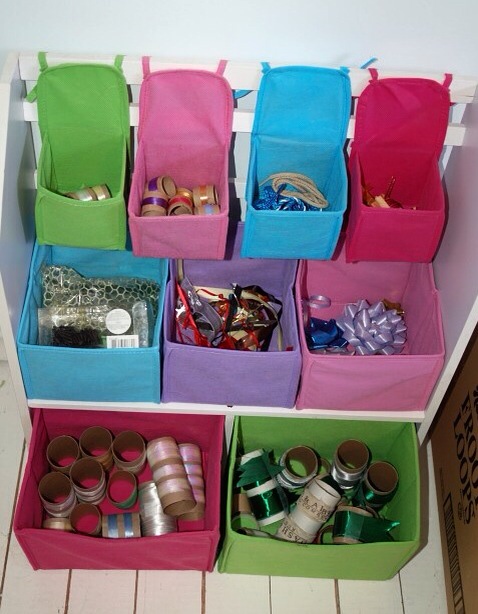
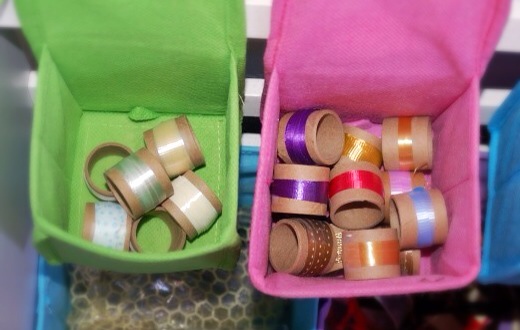
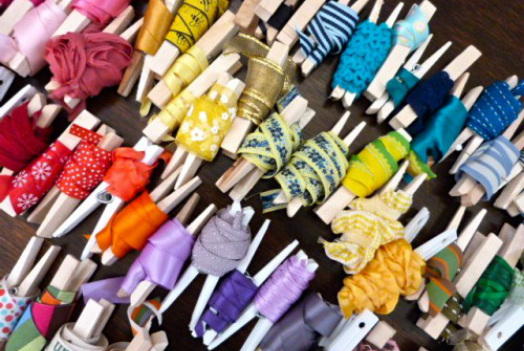
Herding the Hoard of Ribbon ScrapsLike scrap paper, I have a lot of ribbon scraps. They have sat overflowing in a plastic container in a tangled mess that looks like a bowl of spaghetti. To start sorting this out, I untangled and unknotted the ribbon spaghetti, and sorted it into different types, like fabric, wired, gift-wrapping ribbon, string, etc. I had an empty small storage unit with fabric boxes and figured this would be great for keeping the ribbon organized. I wrapped long pieces of ribbon around toilet paper rolls, fastening them with tape. I had some sections of narrow cardboard tube (no idea where I got them), and they were perfect for wrapping short pieces of gift-wrapping ribbon. Short pieces of fabric ribbon got wrapped around clothespins, an idea snagged from Pinterest. It took a while to do all this, but now that it's done, I think it will be pretty simple to prevent ribbon spaghetti in the future.
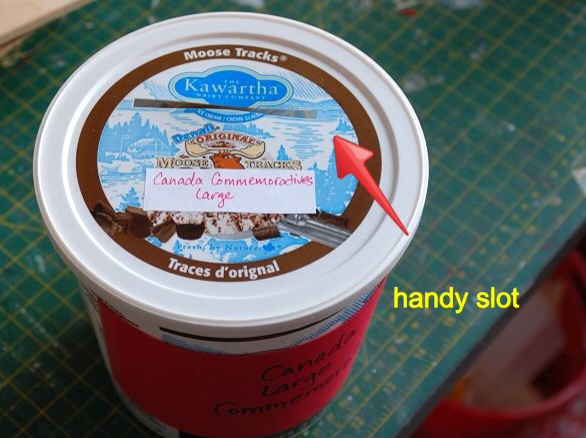
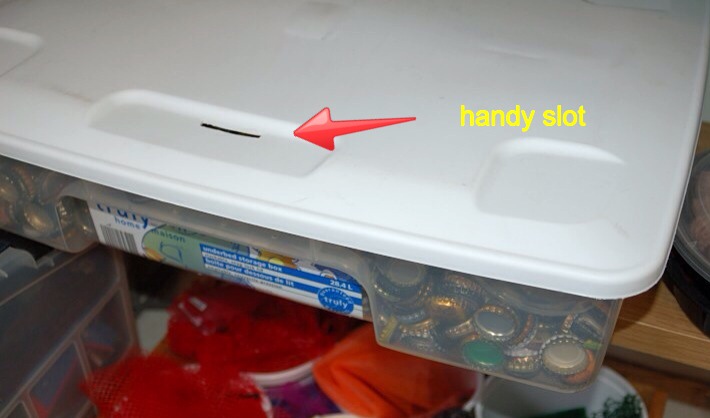
Organization for Lazy PeopleI will be the first to admit that I am bad at putting things away. If something can't be put away quickly, I put it off. There. I said it. So rather than fight it, I am arranging things in my studio to accommodate my laziness. One way of doing this is to employ what I will call the piggy bank tactic. When I'm sorting out my upcycled materials, I find it tedious to pull containers off shelves and open lids to put things away. I realize how ridiculous that sounds. Nevertheless, I thought I would make life easier for myself by cutting slots into the lids of containers so that I can just drop items into their proper places, like putting coins in a piggy bank.
Over the next few months as I work away in my studio, these organization ideas will be put to the test. I have high hopes that they'll help me stay organized and make my work easier.
 I've been sort of dragging my feet into the new year because, throughout the closing months of 2013, I resolved to dedicate the month of January to getting myself organized. I'm not one for new year's resolutions (because I know I won't keep them), but January is the natural time to take stock of how last year went in my home and with my business, and determine what needs to get done in the months ahead. November and December were a flurry of activity, and I looked forward to January when I could take some time to assess. Now that January is here . . . I feel pretty sluggish about making plans and getting organized. Besides business planning and attending to some household projects, I am trying to reorganize my art studio this January. Not that I didn't try, oh, maybe eight times already in 2013. Each time I went through a crazy busy few weeks, I got frustrated with the clutter and chaos that accumulated (see evidence above). This month, I'm determined to devote the time and energy to designing a creative space that will really work, that needs only minor adjustments in the year ahead. As I embark, it feels a little insurmountable.
1. PracticalityThe things I use the most must be within easy reach (in close proximity to where I work, at a shelf height I can reach). I need some empty spaces where unfinished projects or odds and ends can reside until I have time to put them away. Several organization blogs and books I've read say that you shouldn't have empty spaces where clutter can accumulate. Clearly, those authors are not as flawed as I am: my reality is not so orderly, so I'm going to accommodate my more casual working style. So there. I have a lot of things to store in my studio: upcycled materials, tools, art supplies, books, shipping and packaging supplies, and jewelry making supplies, to name a few. I want to group them together according to their purpose so that it's easier for me to find things.
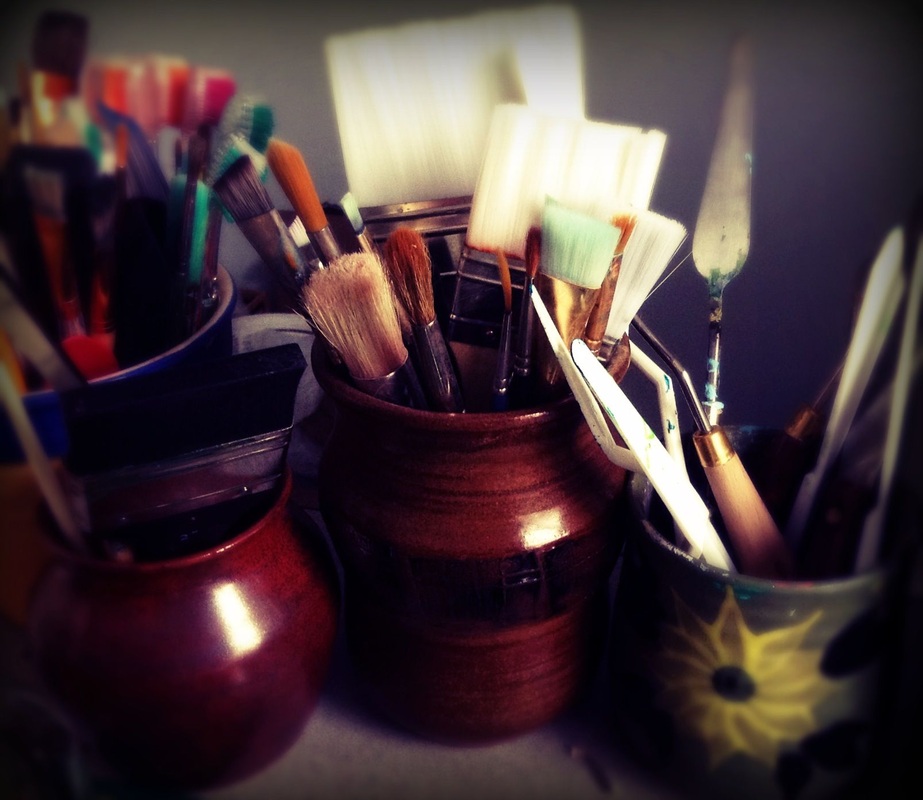
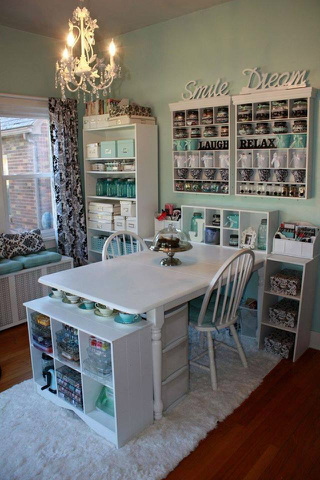
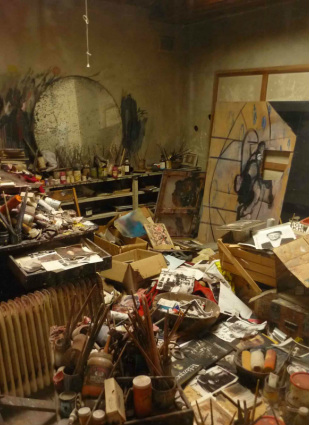
I spend a lot of time in my studio, obviously, so it needs to be a space in which I want to spend time. It must be bright and comfortable, and most importantly, it must inspire my creative senses. For me, that means using quirky upcycled storage pieces, hanging other people's artwork on the walls, taking some time to add decorative flourishes to mundane storage items, and having an idea board where I can tack up random images/objects that tickle my fancy. Starting at the EndIt's hard to know where to start when I survey the mess of bits and pieces that call my studio home. So, I have tried to picture what I want the end result to be. My hours of Pinterest perusing have shown several possibilities that usually fall under two extremes.
I'd like my studio to be something in between these two extremes. I can sort of see it, so I've started setting to work. I'll keep you posted . . . .
August and September were very busy with various festivals and shows where I had the opportunity to show and sell my work. I love doing shows, but it leaves little time for much else, so I promised myself that, after the last show in early October, I would take a couple weeks to focus on things outside the studio. One of these things was harvesting and processing the apples from our backyard apple tree. Our First Apple Harvest!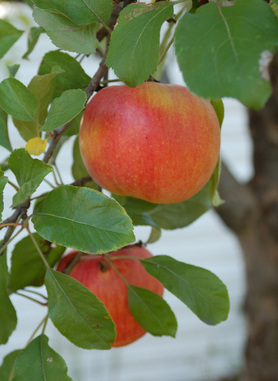 Since Dan and I moved into our house nearly seven years ago, we have been trying to rejuvenate the apple tree and the cherry tree in our backyard. Efforts with the cherry tree have so far been . . . fruitless (bad pun), as the ants and aphids have had the upper hand. The apple tree has fared much better. After some years of pruning in early spring to promote tree growth, and this year, pruning in late spring to promote fruit growth, our tree produced a sizeable crop of apples! We are so excited! We haven't quite figured out what kind of apples they are: so far our best guesses are Spy or Royal Gala. What we do know is that they're delicious. Many of the apples are good enough for eating fresh from the tree. Others, not so much: they're on the ground, partially rotted, or still on the tree after being sampled on by squirrels, worms and birds. As my mother taught me, nothing so good should go to waste, so I decided to make applesauce with the more unglamourous members of our apple crop. Applesauce is a versatile commodity: Dan can take it to work as a snack, I can use it in baking and cooking, and we can eat it with meals. I thought I'd explain the process I used to make applesauce so that you can do the same with fall apples you find at the farmers market or in your own backyard. Saucy!Here's what I used and what you'll need to make applesauce:
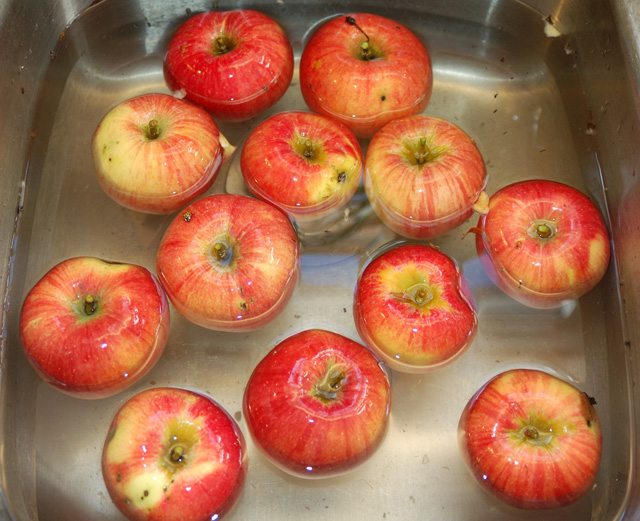
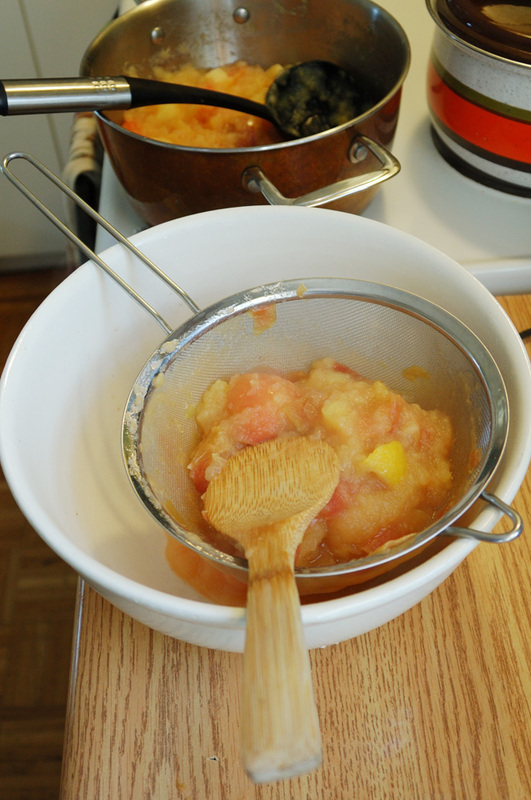
After picking my apples, I dumped them in a sink full of water. (This picture shows about a quarter of what I actually started with.) Then I removed the nasty bits, stems and pits, and cut the apples into quarters. You don't have to be too careful about coring the apples because you'll pass everything through a strainer in the end. Many people leave the pits in, but I didn't because I'm picky like that. 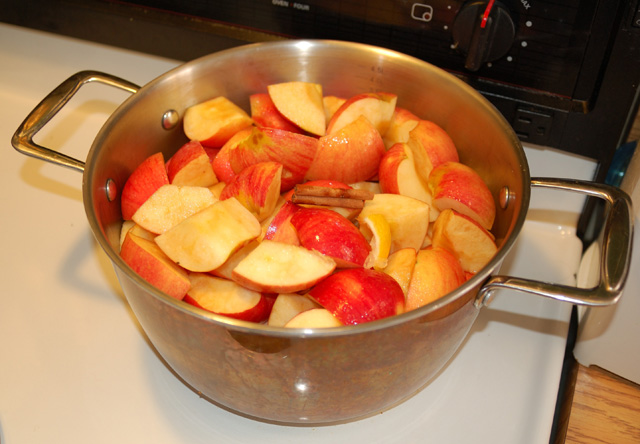
You can fill your pot with apples all the way to the top because they will cook down. I added about an inch of water to the pan, and threw in half a cinnamon stick, a squeeze of lemon juice and a slice of lemon peel. The cinnamon adds a little spice and sweetness, and the lemon juice preserves the colour of the apples and adds a little tang. Next, I put a lid on the apples, brought them to a boil, and then turned down the heat to let them simmer for about 45 minutes (the time will vary depending on your stove and what variety of apples you use). And let me tell you, the house smelled amazing: talk about aromatherapy. 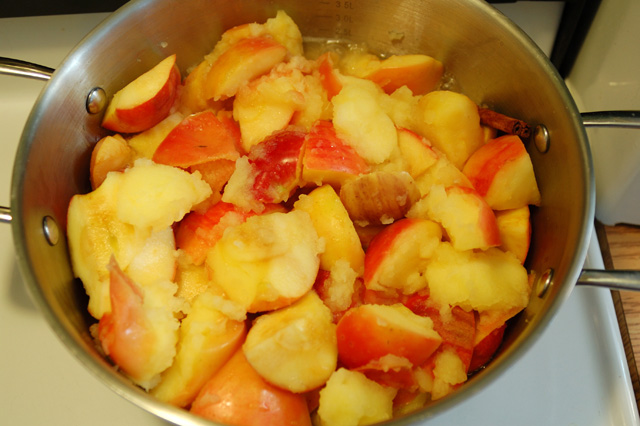
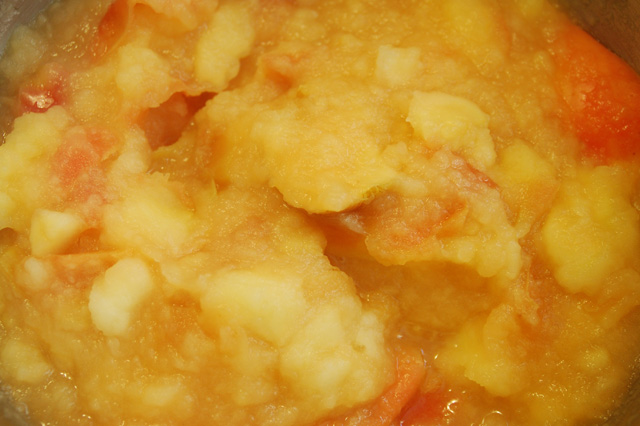
As the apples cook, you'll want to stir them once in a while so all the apples get a chance to soften up. Here are my apples midway through cooking, after a good stir.
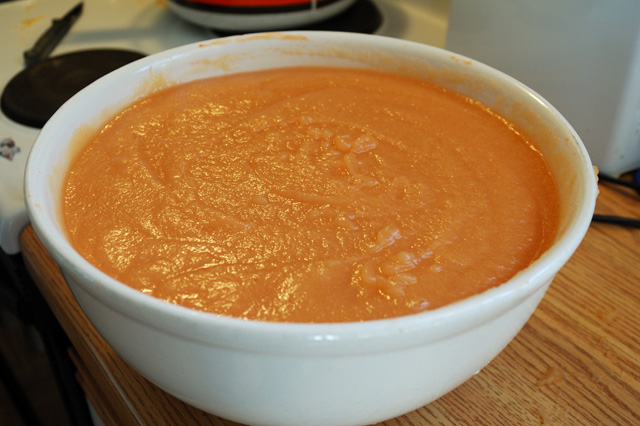
Tada! Beautiful sweet, tangy, pink homemade applesauce. 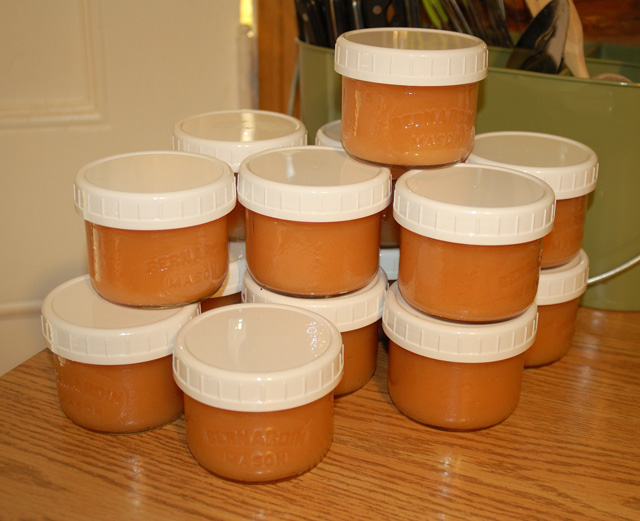
I let the applesauce cool thoroughly and then spooned it into jars. After cooking two pans full of apples, I ended up with 20 cups of applesauce. Not bad. The jars I used to store the sauce have a capacity of one cup: this will make things easier when I need the applesauce for baking, plus one cup is a decent serving size for one or two people. All my applesauce is now in the freezer, ready for its various wonderful uses.
Depending on the apple variety - or combination of varieties - you use to make applesauce, you might want to add sugar before serving it. My backyard apples - whatever they are - are sweet enough to stand on their own. I grew up making applesauce with my family. My parents would get all of us kids around the table to help with all the steps. I never imagined I'd be doing the same thing so many years later. There's something very beautiful about seeing the entire process, from bud to blossom to fruit and all that fruit can provide.
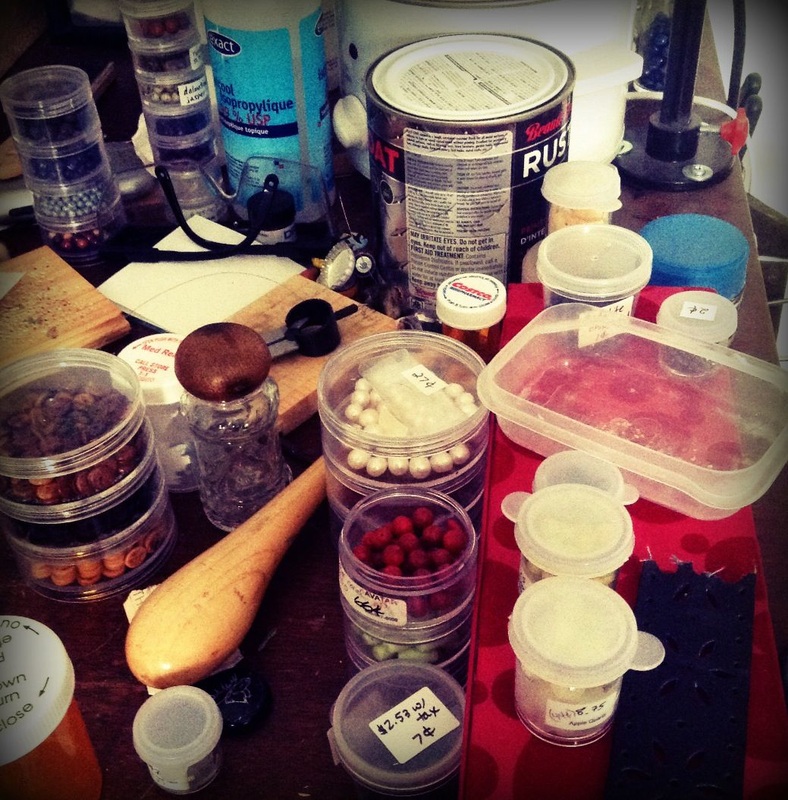
I was super stoked to find this cool retro kitchen storage unit at my local reuse centre. I walked past it a few times, not really noticing its potential until - BAM! - it hit me: this would be perfect for bead storage in my studio. To be specific, seed beads. I think this plastic contraption was made probably to be a kitchen cupboard organizer for spices, by a company called Kitchen Art. I'm guessing it was made in the 80's. I have my seed beads organized into bottles by colour, plus some additional tubes full of beads. I stacked my bottles o' beads on the tiers of the kitchen organizer and put the tubes of seed beads into the organizer's handy pull-out drawer. Everything fits perfectly and is within easy reach of where I work. Dreamy bead storage. I love it when I find obscure and handy things like this! 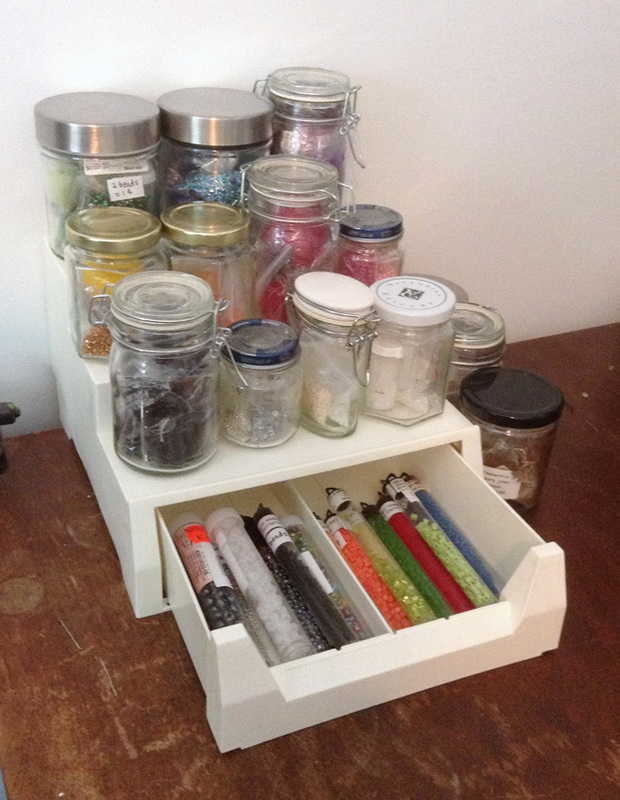 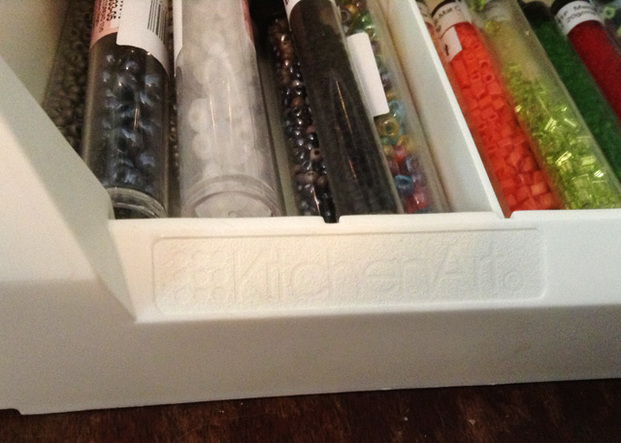 |
Jane Hogeterp Koopman

Subscribe to Jane's Blog by RSS or email:
Categories
All
Archives
January 2018
Stuff I love:
|


 RSS Feed
Proudly powered by Weebly